Photobucket           Photobucket           Photobucket           Photobucket           Photobucket
Showing posts with label family. Show all posts

Friday, May 23, 2014

Minnie Bows


 I just had to do a quick post to share what I got for Mother's Day from my 5 year old, Matthew. Or as I sometimes refer to him on here "Big M" ("Little M" being my 2 year old, Miles). For those of you who don't know him, Matthew loves to make everything out of paper. And I do mean everything. Well for Mother's Day he was absolutely positive that what would make me really happy was a Minnie Mouse bow cookie cutter. So what did he do? He made it for me. Out of paper.


He's such a sweet heart! That's the card he made me complete with Minnie bow "cutter" on the left, and a "cutter" for the polka dots, on the right. He was so excited and so proud of his gift that of course I didn't have the heart to tell him that's not how it worked. So at night after he went to bed I hand cut a few bows and decorated them, leaving one for him to do. 


 I love that he loves making cookies with me, and I love that he tried so hard to think of something I would enjoy. Another bonus is that we got to eat the results, which happens so seldom in this house!


I hope everyone else's Mother's Day was great!


Tuesday, February 12, 2013

conversation hearts - kid's edition


Valentine's Day is almost here and over a month ago I drew up lots of cookie ideas... and then never had a chance to actually make any. Matthew really wanted to make Valentines this year though, so I came up with a simple idea for him... conversation heart cookies!


 We cut out some heart and frosted them in red, and then I let Matthew pick out the sayings. Then with a black food marker he wrote out his Valentine messages (and I have to say, for a kid who only just turned 4 I think his handwriting is pretty good)!


Then he wrote out the names in his Valentines... he chose Avengers, of course! He is obsessed with the Avengers right now.


Lastly we sealed them in bags and stapled a cookie to the back of each card. So easy to do, and he is so proud that he did the work himself! And these could easily be adapted to something other than a cookie... pretty much anything the food pens will write on. Maybe I'll try chocolate next time!


So these may be the only Valentine cookies I get around to making this year, but I love them. So proud of my boy, maybe one of these days I'll be posting his own cookie designs!

And in case I don't get another post in...

Happy {early} Valentine's Day!

Wednesday, February 6, 2013

an early Valentine's Day party


Matthew has been begging to decorate cookies, so on Monday we invited a few friends over and had an early Valentine's Day cookie decorating party!


The kids had so much fun - we had icing and sprinkles to decorate with, and I also iced a few in advance so that the kids could use my food markers to draw pictures.

But of course my child was writing things on all of his cookies, he is so proud to be learning to spell! Here is his "Mommy Daddy Miles Matthew" cookie (complete with cheesy grin)...


There was lots of taste testing going on...


But the kids got the hang of it pretty quick, and they did such a good job!


And this little lady can certainly hold her own with the boys 
(which is fortunate, because just look at that face)!


 Love the cheesy grins!


The cookies turned out great, if a little over done in some cases.


 Wait, I think that one deserves a closeup...


According to Charlie, "Matthew told me that my cookie looks incredible!" 

Seriously, we had a lot of fun. Matthew absolutely loved it and keeps asking to do it again! Which we will, when I'm ready to combat that mess again.

And now for me to start on my own Valentine's cookies...

Saturday, December 29, 2012

a pirate birthday


New Year's Eve is coming... and in this house that pretty much means only one thing: little m is having a birthday!  While planning out what kind of cake to make for the big 1, I realized I never put up pictures from big M's birthday. I can't post about Miles before I get to Matthew, so here's a quick look at the cake and cookie topper I made for this adorable face....


So cute, I can hardly stand it.

He specially wanted a pirate party this year... which amounted to a pirate cake and making everyone wear eye patches. As it was mostly grownups at his party, it was pretty entertaining! 

I knew I didn't have time to make a bunch of cookies so instead I went for one big one. It has two sticks attached to it that are stuck in the cake for support.


In case you couldn't tell, he was pretty pleased with his cake!


I've got another party to plan so no lengthy explanations here... just a cookie stuck on top of a cake. And Matthew couldn't have been more excited... Easiest. Cake. Ever. Clearly I didn't even bother to make the frosting neat... I figure ocean waves are choppy, and Matthew is 4. We're good.


 Now on to the little one...


Monday, December 24, 2012

a christmas assortment


It's Christmas Eve! Well, the morning of anyway. Matthew could not be more excited... and actually I'm pretty excited too. This has been hard long and hard - but good - year. And I feel our Christmas this year is going to be our best yet. And thankfully I have my shopping done, Santa has his shopping done, and all of my cookies have been shipped or handed out. Tomorrow I clean house in preparation for family (and to try and get an early handle on what will surely be a tornado coming through our home Christmas morning)... and I can sit back. So happy about that.


I had so many cookies to show off this year, and I got a late start posting them, so I figured I would do a group post. This is a general assortment of the larger cookies I did... here is a favorite one of mine:


It's truly hard to capture the iridescent colors just right. The more I 
photograph the better I'll get though (in theory...). 


I had several people tell me the bells and big bows were their favorites. Truthfully, I only did one large bow cookie in the beginning, and it was only to cover up a somewhat failed experiment. (The bow cookie pictured above is that cookie!) But after a few comments I decided to make a few more, and I'm glad I did...


I might fit one more post in before Christmas is over... but in case I don't...

Merry Christmas everyone!


I can not believe Matthew in this picture... when did he stop being my 
toddler and turn in to such a kid...

Thursday, December 20, 2012

homemade almond roca... or... just about the best stuff ever


 This stuff is... just the best. Seriously. It's like crack. I can't take credit for it, the recipe comes from my mother-in-law Karen. I've made one addition, but otherwise this is hers. I asked her a couple years ago if she wouldn't mind me sharing it, but I just never ended up having the time. 

Aside from the fact that it tastes amazing, the best part about this recipe is that it is EASY. SO EASY. I only make it around Christmas otherwise it would probably be the death of me. And everyone who comes over.
_____________________

Homemade Almond Roca

Ingredients
2 sticks (1 cup) salted butter
2 cups sugar
a splash (1 teaspoon? 2 teaspoons? whatever suits you) of vanilla
1 large Hershey's Symphony bar, broken into pieces
1 bag of semi-sweet chocolate chips
chopped almonds

The directions are simple and pretty straight forward:

On medium-high heat, melt butter in a pot on the stove. 
When the butter is mostly melted add the sugar and vanilla.

Then you stir...and stir and stir. As it heats up it will change consistency and color 
(more on that below) but you keep stirring until it turns a nice toffee brown.

Pour into cookie pan with raised edges (in my pictures below I used parchment paper - this is not necessary, nor is buttering the pan - I only used parchment so that I could easily lift it from the pan before breaking it up). Immediately sprinkle symphony bar and chocolate chips. Use a spatula to spread chocolate around into an even layer.

Sprinkle chopped almonds on top. Then let it cool... which takes a while.

To break it up use a sharp knife (such as a steak or paring knife) like an ice pick and it will break in to small chunks.
_____________________

 The recipe is truly easy, but it helps to know a few things...

You'll start out with your butter (melted), sugar and vanilla.

A wooden spoon or a heat resistant spatula are good for stirring. Careful about the spatulas - if they aren't made for high heat then they will melt in this mixture!


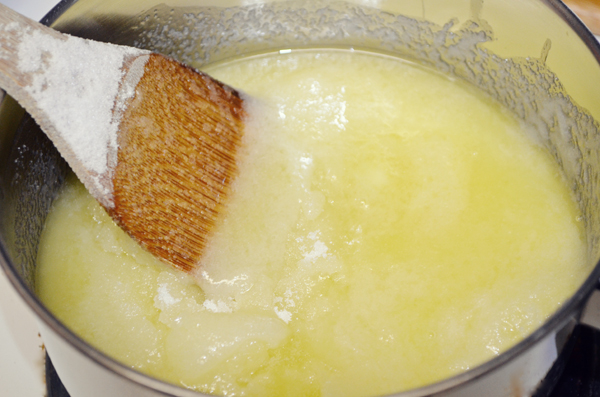
As you stir, and as it heats up, it will change consistency and be sort of  cloudy and frothy. Just keep stirring. And make sure you are consistently scraping the sides, bottom, and corners of the pot. You really want to make sure all of that sugar stays incorporated. 


 It will stay frothy for a little while, but eventually you'll see the color start to change


 Keep stirring! It will start to turn a nice amber toffee color


At some point the frothy-ness dies out and it goes smoother


 You'll see in the picture the color I like to end it at.... you can cook it a little more or less depending on taste. Cook it longer and you'll have a much stronger flavor (too long and it can taste burnt, but you'll know if you went to far), and cook it less time and you'll have a lighter flavor.

Also, like I said, there is no need for parchment paper underneath. However if you'd feel better breaking up the candy on a cutting board then parchment is a good idea because it allows you to move it. 

When you pour the candy out - just give the pan a good shake to spread it around. Sometimes I'll use a spatula, but just make sure it's one that can withstand high heat... the cheaper ones will melt with how hot this gets!


When it's time for the chocolate, don't feel you need to pre-melt it. The candy will be so hot that it will do all of your melting for you.


I usually try to get a nice even layer and spread it right up to the edges. 

As you spread, bear in mind the chocolate will never be 100% smooth because the Symphony bar has chopped almonds and toffee in it already.


After you sprinkle your almonds (as you can see I prefer them chopped extremely fine), press them down with your hand a little to make sure they stick.


This last part is great if you need to get some aggression out! Just use the tip of a sharp knife to break it up, ice pick style.


And there you have it! I do have two more side notes though...

1. If you leave this out, uncovered, overnight it will change consistently slightly. Personally, I prefer to do it that way... it makes the crunch of it slightly less tooth shattering. 

2. The first time I made this I was a little horrified at the thought of cleaning the pot. The leftover candy coats the sides and is rock solid. As it turns out though, fill it with super hot water and within a few minutes it will all be dissolved. Easy peasey.

I hope you enjoy this - it is seriously the best stuff ever! And it's hands down the number 2 (after my cookies, of course!) thing people request from me!

Saturday, September 29, 2012

I'm baaaack!

Life keeps changing, but it looks like I'm going to finally - really - be back to making cookies.


Updates soon...

but I'm working on some big changes!


{dragonflies and dancing fairies were for my sister
Merry's fairy party... it's as awesome at it sounds}