Photobucket           Photobucket           Photobucket           Photobucket           Photobucket
Showing posts with label recipes. Show all posts

Tuesday, March 26, 2013

the best chocolate chip cookies


I've been baking all my life. I mean as long as I can remember! I still have this vivid memory of being maybe 6 or 7 and deciding I was going to make cookies. I pulled out one of my mom's recipes and the first direction was to "cream butter and sugar together". For the life of me I could not imagine what "creaming" meant. That was the first time I ever read a recipe on my own and no one had ever mentioned the term before! I went and knocked on her door and I remember yelling through her bedroom door (I think she was sleeping) "Mom what does it mean to cream butter and sugar!?"

Anyway.

When I was about 16 I decided that I had never had a chocolate chip cookie that was exactly the way I imagined one should be... so I decided I had better come up with one. Chocolate chip cookies are tricky... everyone has their own idea as to what makes one ideal. Is it chewy? Crunchy? Cake-like? Maybe dark chocolate or milk chocolate or with sea salt sprinkled on top? I spent years coming up with this recipe, and even then I still tweak it every so often. This is my most recent version, to which my husband has claimed is better than the recently famous NY Times chocolate chip cookie recipe. That's his opinion, but I'd love to hear yours!
 _____________________________________________

Chocolate Chip Cookies

Ingredients

1 cup (2 sticks) unsalted butter, softened
1 1/4 cups (10 oz.) dark brown sugar
1 egg
2 tablespoons milk or cream
1 tablespoon vanilla
1  5.1 oz. pkg vanilla instant pudding
3/4 teaspoon salt
1/2 teaspoon baking powder
1/2 teaspoon baking soda
2 cups (240 grams) all purpose flour
1 pkg semi-sweet chocolate chips

Directions
  1. cream butter and brown sugar
  2. add egg, milk, and vanilla. beat until fluffy
  3. add pudding mix, salt, baking powder, and baking soda. beat on med to med-high until fully incorporated and mixture if fluffy
  4. add flour all at once, beat on low until fully incorporated but but no more than necessary
  5. add chocolate chips and mix on low or by hand until chips are distributed evenly
  6. refrigerate dough for 3-4 days for best flavor, but feel free to cook them right away!
  7. shape into balls about golf ball size and bake at 350 degrees for 17-20 minutes 
  _____________________________________________


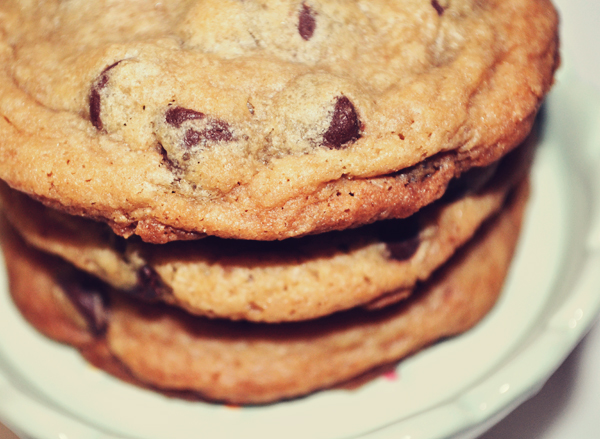
I love the way these cookies look... if you look closely you can see the outside is almost crackly looking... these are chewy but they have a sort of crunch to them on the outside!

Some notes about this recipe... 

1. Do not use the "cook & serve" vanilla pudding mix instead of instant. One might think it wouldn't be that different... and one might end up with a very weird consistency of cookie that doesn't hold it's shape!
2. You don't have to use dark brown sugar, regular brown sugar is fine, but I find the stronger flavor very complimenting of this cookie. 
3. Some people like to sprinkle a little coarse sea salt on their cookie before baking... you are welcome to do what you want, but in my experience it doesn't go well with this particular recipe. 
4. Letting your dough sit for a few days can be hard... and it will certainly taste good if you bake it right away... but to me it is worth the wait. The flavors really develop and the consistency is smoother.
5. This is my personal preference - I like to make a double batch of this, let it sit a few days in the fridge, then roll it into balls and freeze them. Then you can just pop a few in the oven any time you want fresh cookies!


**I'd like to note that this is the third batch of cookies (and I make double the amount in the recipe!) I've made ever since deciding to put this recipe up! I had to make three batches because the cookies disappeared so fast I never had a chance to take any pictures!**


Matthew was very afraid of not getting one of these... so I promised him I'd set one aside for him but he was convinced that if it didn't have a note then it would get eaten anyway (he dictated exactly what the note should say so that there would be no...


Wednesday, February 13, 2013

ahoy it's a boy!


A friend of mine is about to have a baby and about a week ago I made some cookies and a cake for her shower. Another friend of mine was the one throwing the shower and it was adorable. Here is the invitation:


 The party was just perfect, down to the last detail.


 She even made that tabletop out of old pallets! (it's just resting on top of her normal table)


these spoons were just too adorable...


Karen looks so pretty! When I had only a month left to go I definitely didn't look this good.


 Here is my cake - the gradient (or ombre {please do not pronounce that "om-bray"! ...sorry, pet peeve of mine}) color was a bit of an experiment. I wasn't sure how it would look with the color fading diagonally but I like it! If there's any interest I'll definitely do a tutorial on how I did it! The texture ended up looking a bit like fish scales... which is just as well with the theme! But I'm not sure anyone was paying attention once it was served... chocolate cake with strawberry swiss meringue buttercream and vanilla buttercream on the outside. SO. GOOD. Or at least I felt that way! Though I'm guessing I'm not the only one, based on the rate at which it disappeared!


Here's a closeup of the cookies hanging up...


 So congrats Karen, happy baby-making and all of that! I wish you an early delivery (because seriously what pregnant woman wants to drag that last month out any longer than necessary). She's due the same day as my sister... whose shower I never really took photos of since I was the one actually hosting it! I'll have to see if I can scrape together enough photos to do a post on that one because it was so much fun! In the meantime, one last shot of these sweet little whales...


Thursday, December 20, 2012

homemade almond roca... or... just about the best stuff ever


 This stuff is... just the best. Seriously. It's like crack. I can't take credit for it, the recipe comes from my mother-in-law Karen. I've made one addition, but otherwise this is hers. I asked her a couple years ago if she wouldn't mind me sharing it, but I just never ended up having the time. 

Aside from the fact that it tastes amazing, the best part about this recipe is that it is EASY. SO EASY. I only make it around Christmas otherwise it would probably be the death of me. And everyone who comes over.
_____________________

Homemade Almond Roca

Ingredients
2 sticks (1 cup) salted butter
2 cups sugar
a splash (1 teaspoon? 2 teaspoons? whatever suits you) of vanilla
1 large Hershey's Symphony bar, broken into pieces
1 bag of semi-sweet chocolate chips
chopped almonds

The directions are simple and pretty straight forward:

On medium-high heat, melt butter in a pot on the stove. 
When the butter is mostly melted add the sugar and vanilla.

Then you stir...and stir and stir. As it heats up it will change consistency and color 
(more on that below) but you keep stirring until it turns a nice toffee brown.

Pour into cookie pan with raised edges (in my pictures below I used parchment paper - this is not necessary, nor is buttering the pan - I only used parchment so that I could easily lift it from the pan before breaking it up). Immediately sprinkle symphony bar and chocolate chips. Use a spatula to spread chocolate around into an even layer.

Sprinkle chopped almonds on top. Then let it cool... which takes a while.

To break it up use a sharp knife (such as a steak or paring knife) like an ice pick and it will break in to small chunks.
_____________________

 The recipe is truly easy, but it helps to know a few things...

You'll start out with your butter (melted), sugar and vanilla.

A wooden spoon or a heat resistant spatula are good for stirring. Careful about the spatulas - if they aren't made for high heat then they will melt in this mixture!


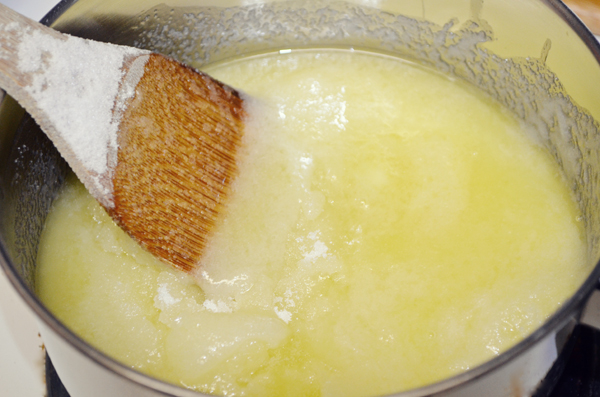
As you stir, and as it heats up, it will change consistency and be sort of  cloudy and frothy. Just keep stirring. And make sure you are consistently scraping the sides, bottom, and corners of the pot. You really want to make sure all of that sugar stays incorporated. 


 It will stay frothy for a little while, but eventually you'll see the color start to change


 Keep stirring! It will start to turn a nice amber toffee color


At some point the frothy-ness dies out and it goes smoother


 You'll see in the picture the color I like to end it at.... you can cook it a little more or less depending on taste. Cook it longer and you'll have a much stronger flavor (too long and it can taste burnt, but you'll know if you went to far), and cook it less time and you'll have a lighter flavor.

Also, like I said, there is no need for parchment paper underneath. However if you'd feel better breaking up the candy on a cutting board then parchment is a good idea because it allows you to move it. 

When you pour the candy out - just give the pan a good shake to spread it around. Sometimes I'll use a spatula, but just make sure it's one that can withstand high heat... the cheaper ones will melt with how hot this gets!


When it's time for the chocolate, don't feel you need to pre-melt it. The candy will be so hot that it will do all of your melting for you.


I usually try to get a nice even layer and spread it right up to the edges. 

As you spread, bear in mind the chocolate will never be 100% smooth because the Symphony bar has chopped almonds and toffee in it already.


After you sprinkle your almonds (as you can see I prefer them chopped extremely fine), press them down with your hand a little to make sure they stick.


This last part is great if you need to get some aggression out! Just use the tip of a sharp knife to break it up, ice pick style.


And there you have it! I do have two more side notes though...

1. If you leave this out, uncovered, overnight it will change consistently slightly. Personally, I prefer to do it that way... it makes the crunch of it slightly less tooth shattering. 

2. The first time I made this I was a little horrified at the thought of cleaning the pot. The leftover candy coats the sides and is rock solid. As it turns out though, fill it with super hot water and within a few minutes it will all be dissolved. Easy peasey.

I hope you enjoy this - it is seriously the best stuff ever! And it's hands down the number 2 (after my cookies, of course!) thing people request from me!

Saturday, March 24, 2012

something a little different

I normally only post about sweets, but I tried this out last night for dinner
and it was so good I have to share it with you...

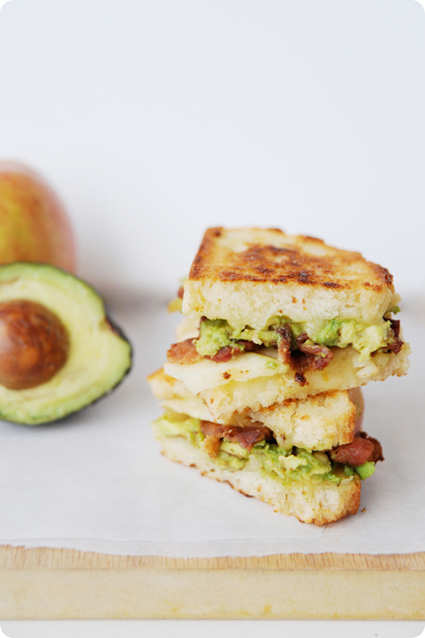
Bacon Avocado Grilled Cheese Sandwich


This recipe is simple:

sourdough bread
pepperjack cheese
avocado
bacon
and apple slices
(yes you read that right)


This recipe is not my own, I got it from here, and she doesn't say whether this is her own recipe or not  (the photo above is hers), nor is she very specific about the recipe... but it's grilled cheese. Hard to mess up.

I toasted the sandwich with the cheese and bacon, and afterwards added sliced avocado and honeycrisp apples. I did it this way because I prefer both my avocados and apples cold. It made for a nice combo of hot and cold, and while I am not normally a fan of mixing fruit with things like meat (*hem hem* Hawaiian pizza - no thanks), the apple definitely made the sandwich. It took what would have just been a good sandwich to another level!

Trust me, you just need to try this. You can thank me later.


Monday, May 16, 2011

French Macarons

This post is going up quite late - actually I had planned to have it up before Mother's Day! Oh well, too late now. I hope all of you mothers out there had a great day, my boys gave me some great gifts... all baking related, so you'll be seeing those soon! Although there is probably going to be a lag in posts in the next couple weeks... I'm not making as many cookies, but for good reason! I'll be able to you guys in a couple weeks, and until that time hopefully I'll be able to put out some more recipes instead.


For Mother's Day I wanted to make something extra special for the moms in our life.

Has anyone out there not heard of French Macarons?

Are these the new cupcake or something? They seem to be gaining in popularity like crazy! It's no suprise though, as they are both unique and incredibly delicious! Maybe one of the things that make them so desirable though, is their rarity. Unless you are in Paris (I wish), you are probably going to have a hard time finding somewhere to buy these. I've seen a few bakeries that will ship them, but I've never ever tried that route. Of course if you can't buy them, the next obvious option is to make them. Macarons are known for being finicky though, so they aren't something you can just decide to whip up one afternoon.


I'm no expert on macarons - far from it. Mine are not perfect. Yet. I have only made them a few times, and my first time was a complete disaster! They came out great the second time, except I had run out of parchment paper (and didn't have silpat at the time) and used wax paper to cook them on thinking it was my next best option. Wrong!

{EDITED TO ADD: I receive a surprising number of google searches looking to see if wax paper is ok to use with macarons. Although I never addressed it directly in this post, I think the context is clear. In any case I will spell it out for anyone who is looking for a direct answer. DON'T DO IT! The macarons cooked beautifully, but when it was time to take them off of the wax paper... it was like they were superglued down. I just barely soaked the paper in water and was able to peel about half of them off... but unless you are VERY careful you will ruin the macarons... plus it took forever. Trust me on this, just invest in parchment paper or silpat.}

If there is one thing I've learned about making macarons, it's that you have to be extremely precise in every aspect of the recipe. After my first failure I did a lot of googling (this is what I do when I have a question about anything!) to find reasons why I had failed. There is a lot of information out there with tips and tricks and some of it is even contradicting... the perfect way to make macarons is not as elusive as it seems though.

Most of the recipes I have come across are very similar, and my two favorites come from BraveTart and Tartelette. I like BraveTart's view on macarons... which is that they are only a cookie. In my opinion, with some planning and prep... anyone can make these! I won't put a recipe on here, as I only like to put up my own recipes... but check out both of the links above and you will find some great recipes.

If there is interest out there, I can do a step by step post on how to make these. For now, I'd just like to mention some of the thing's I've learned along the way!

* Aging your egg whites - To age egg whites you separate the egg whites into a bowl and cover with a paper towel, leaving out on the counter for 24-48 hours. Some people are weirded out by leaving eggs at room temperature... to which I say: chickens don't lay eggs in a refrigerator. In many other countries, eggs are not even stored in the fridge. The purpose of aging is to let some of the water evaporate out of the whites. Some people say you should do this, some say it's not necessary. In my opinion, you will have a much easier time if you do... but I think it depends more on where you are cooking than anything. Moisture (excessive, at leaste) seems to be an enemy of the macaron, and as I live in the Seattle area - where moisture in the air is to be expected - the less moisture in the egg whites from the start, the better. I suggest you try it different ways, and see what works best for you.

* Measuring - If you have it, use a digital scale to measure all ingredients (in fact, that's how I bake 100% of the time). Also be sure to sift your almond flour and powdered sugar together (the powdered sugar will keep the almond flour from sticking). I recommend sifting at least twice.

* Almond Flour - Almond flour is nice, but expensive. For those who don't have access or don't want to spend the money, you can grind your own almonds (watch it carefully so it doesn't turn into butter!). I go the middle ground and buy almond meal at Trader Joes. If you grind your own, you will want to dry it out either on the counter for a few days or in the oven (be careful not to burn!). You want it to be dry enough that if you try to pack it into a ball, it will not hold together.

*Humidity - As I said, moisture seems to be an enemy of the macaron and the more moisture in the air, the more likely your macarons will fail. On a particularly wet day, I make the macarons in the kitchen with the oven door slightly ajar so as to dry out the kitchen. Also macarons release moisture as they cook, and I've found it helpful to put a wooden spoon in the door of the oven while they are cooking so that there isn't too much moisture. Excessive moisture leads to cracked tops on the shell. I've heard that if you have a convection oven this isn't as much of an issue... but I really don't know how true that statement is!

*Mixing/Batter Consistancy - I think one of the key aspects of getting a macaron to come out right is the consistancy of the batter. It's all in how long you mix for. You don't need to be particularly gentle while mixing, but you do have to watch the consistancy of the batter closely. Ideally it will be the consistancy of magma. Or at least, that's what every recipe will tell you... however I don't know who all these people are who seem to have first hand experience as to what magma is like! That term has always confused me... and I will say that this step is the one area where I still need improvement. I tend to leave my batter just a little too thick most of the time. Mostly I think I'm afraid of it ending up too thin, at which point there isn't much you can do to save it. I've read that you can add small amount of almond flour to thicken it, but I really can't say if that would work.

*Piping - An easy trick to get your shells all a consistant size: trace circles on a piece of parchment paper and then flip it over and pipe onto the other side. Don't make the mistake and forget to flip the paper over... I did that once and ended up with pencil marks on the underside of my macaron shells!


Well that's about it for the moment. If anyone has any questions or needs any help, feel free to comment or email me with questions! Also, are there any particular recipes or baking help anyone is interested in? If there's something you'd like to see here on the blog, be sure to let me know!

Monday, April 18, 2011

coconut buttercream frosting - and a wedding cake!


My baby brother got married! I actually already talked about that in this post here, but that was the actual wedding in Idaho. Their reception was out here in Washington since this is where they are both from. I made the cake and about 17 dozen cookies for their reception. That, along with a couple other orders, is why I was so busy last week!


 According to Tommy (my brother). neither him or Carly are big cake fans. Because of this they didn't want regular cake, so they decided on pound cake with Coconut buttercream frosting. That, my friends, is a whole lot of pound cake! It was so good - but rich!


For transportation reasons, I had to keep the tiers separate and
assemble/finish the cake when I got there...


And of course I got there late, so I was rushing to get things done! As my sister says... that's what happens when you try on 4 different dresses and can't decide what to wear! It's true. In the end I just went with something that matched my boots because I just had to wear them... I wish I'd gotten pictures of those!


I had a helper though, so that sped things up was completely adorable but a major time waster! It's hard to get things done with a two year old trying to swipe a taste of frosting.


He is too cute to be upset with though!
Thankfully Grandpa swooped in and saved the day cake.


People were starting to arrive as I was finishing, but I think I did alright!


Tommy said they wanted a "homey" looking cake... I'm not sure exactly what that means... or if I should be offended that they came to me to produce something "homey"... but he's my brother so I suppose I'll give him the benefit of the doubt!


 Aren't they cute? Here they are exchanging their rings.


Carly just looks so pretty here!


Cutting the cake... you can see from these pictures that as wedding cakes go, this one is on the smaller side. They didn't want anything too big so the largest tier, on the bottom, is just 12 inches.


 They donned aprons while serving the cake - naturally my brother wore the girly one!


 So how about a recipe? The coconut buttercream frosting is just wonderful! Again, it's very rich - especially when paired with the pound cake - but so amazing!

__________________________________________

Coconut Buttercream

3/4 cup solid vegetable shortening
3/4 cup (1 1/2 sticks) butter, softened
1 1/2 tsp. coconut extract
3 tablespoons water
6 cups powdered sugar (about 1 1/2 lbs)

1. In a large bowl, cream shortening and butter.
2. Add coconut and water .
3. Gradually add sugar, a little at at a time, until all of the sugar is
incorporated. Be sure to scrape the sides and bottom of the bowl often.
Continue to beat until icing is light and fluffy.

* Refrigerated in an airtight container, icing can be stored up to 2 weeks. Rewhip before using.
* This recipe makes enough to fill and ice a standard two 8" or 9" round layers, or three 6" round layers.

__________________________________________

 I've got wedding cookies to show you guys too, those will hopefully be up tomorrow! In the meantime I'll leave you with this beautiful picture my mom took of the reception hall... I'll have to find more pictures of the reception itself, it was so pretty!


Monday, April 4, 2011

strawberry swiss meringue buttercream

 I've got some more cookies to show you guys, but as the cookies have not yet been delivered (and I like to surprise the recipients) I won't be posting them up until tomorrow! In the meantime I thought I'd post another recipe. For those few of you who read my personal blog, you'll recognize this as a repeat. This recipe is one of my most popular and requested, so I had to share it anyway! 

When I first saw this recipe, I dismissed it as something I would probably never take the time to make because at first glance it sounded difficult and too time consuming to make (of course, this was before I started baking to the degree I do now). I eventually ended up giving it a try because... well, it sounded good! And WOW, is it good. It's light and fluffy, and just the right amount of sweet. It's also much stiffer than it appears which makes it great for filling cakes.
 

Strawberry Swiss Meringue Buttercream
1  1/4 cup granulated sugar
2/3 cup egg whites
2  1/2 (1  1/4 cup) sticks butter, softened
1/4 cup strawberry puree
1. In the bowl of an electric mixer, whisk together sugar and egg whites.
2. Set the bowl over a pot of boiling water. Whisking constantly, heat until all the sugar crystals have dissolved and the mixture is hot. Get it as hot as you can, being careful not to cook the eggs.
3. Put the bowl back in the electric mixer. Using the whisk attachment, beat on high speed until the mixture forms a stiff meringue and the bottom of the bowl comes to room temperature, about 10 minutes.
4. Stop the mixer and replace the whisk attachment with the paddle attachment. Set the mixer to low speed and add the butter, a few cubes at a time. When all the butter is incorporated, turn the mixer to medium speed and beat until fluffy.
5. Set the mixer to low speed and add the strawberries. Once the strawberries are incorporated, scrape the bowl and continue to mix on medium speed until you have a smooth, creamy texture. Don't worry if the buttercream appears curdled, it will become smooth again with continued beating. If the buttercream is too liquid, refrigerate until completely cool, then rewhip.

A few notes about this recipe:

* You can use the buttercream immediately, store it in an airtight container at room temperature for up to two days, or refrigerate it in an airtight container for ten days.
*After storing the buttercream in the fridge, you need to reconstitute it before you can use it. Bring to room temperature and beat on medium speed until smooth.
* This recipe makes enough to ice 24 cupcakes, or fill one 8" or 9" round cake.
* For vanilla flavor, replace strawberries with 3 tablespoons vanilla.


Matthew is a big fan too! He's actually a really picky eater - the only thing he never hesitates to eat is anything I offer him off of a whisk like this. He just knows its going to be good.


* In the pictures here I've paired this frosting with French vanilla cupcakes. So good.

Thursday, March 10, 2011

pineapple upside down cake

pineapple cherry brown sugar upside down upsidedown cake how to make homemade grandmama grandma recipe depression ware glass plate family

Pineapple upside down cake is possibly one of my favorite desserts... my mom has been making it for as long as I can remember. This recipe actually comes from my Grandmama (that is her depression ware glass plate in the picture), and has been tweaked just a little with each generation. 

__________________________________________

Pineapple Upside Down Cake

1 can pineapple rings, drained (reserve juice)
maraschino cherries
1/4-1/2 cup butter
brown sugar
1 box yellow cake mix (or vanilla)

1. Mix cake according to directions, but substitute water for pineapple juice. If there isn't enough pineapple juice, substitute remaining water with milk.
2. While oven preheats (heat according to cake mix), put 1/4 - 1/2 cup butter in cake pan and place in oven to melt.
*Amount of butter used is based on how rich you want your cake to be. Obviously more butter makes it tastier (and this is how my Grandmama does it) but some of us like a little less fat! 
** If you don't have a pan that will fit a whole cake mix, divide between two pans.
3. When butter is melted, swirl to coat sides of pan. Sprinkle brown sugar over melted butter... there is no amount because it's really a personal preference. I prefer more, but sprinkle enough to get a good layer. If needed, use the back of a spoon to smooth it into a fairly even layer.
4. Decorate with pineapple rings and cherries, if you choose to cut your cherries in half (I do) make sure to place the cherries upside down so that when you invert the cake they will have the rounded side up!
5. Pour cake batter into pan and bake according to box. 
6. When cake is done, cool for 5 minutes before inverting onto plate. If necessary use a knife to level cake before inverting.

__________________________________________

pineapple cherry brown sugar upside down upsidedown how to make cake homemade grandmama grandma recipe depression ware glass plate family

Steps 2 through 4 are shown here. Personally I'm one of those people who likes to have a visual of what exactly I'm supposed to do!


pineapple cherry brown sugar upside down upsidedown cake homemade grandmama grandma recipe depression ware glass plate family

I'm actually not the big of a fan of cherries! That mini cake was more for me than anyone else.

pineapple cherry brown how to make sugar upside down upsidedown cake homemade grandmama grandma recipe depression ware glass plate family

Doesn't that just look so good? There's something about the way this cake looks... you just know it's going to be tasty! For anyone out there who's never tried this, it's an absolute must. And for anyone out there who's never made this because it seems difficult - you could not be more wrong! 

But then again, you can never really go wrong with one of my Grandmama's recipes.